Table of Contents
- What Are Google Business Profile Posts?
- Why Schedule Google Business Profile Posts?
- DAXRM’s Google Business Profile Features
- How to Schedule Google Business Profile Posts with DAXRM
- Step 1: Sign In to DAXRM
- Step 2: Create Your First Campaign
- Step 3: Connect the Google Business Profile
- Step 4: Review and Optimise the Connected Profile
- Step 5: Open the Post Scheduler
- Step 6: Choose the Post Type
- Step 7: Write the Post Content
- Using DAXRM’s AI Post Writer
- Step 8: Add an Image or Visual
- Step 9: Add a Call-to-Action
- Step 10: Select the Publishing Locations
- Step 11: Set the Publication Schedule
- Step 12: Review and Confirm
- Track GBP Results and Automate Reporting
- Best Practices for Scheduling GBP Posts
- Keep Your Google Business Profile Working for You
Keeping a Google Business Profile active can be challenging, particularly for agencies managing numerous clients or businesses with multiple locations. Without a reliable workflow, posting often becomes inconsistent and profiles are left without current offers, events or business updates.
DAXRM centralises Google Business Profile management, allowing you to schedule posts, respond to reviews, update profile information and monitor performance without continually switching between accounts. In this guide, we explain how to connect a profile and schedule updates, events and offers using DAXRM.
What Are Google Business Profile Posts?
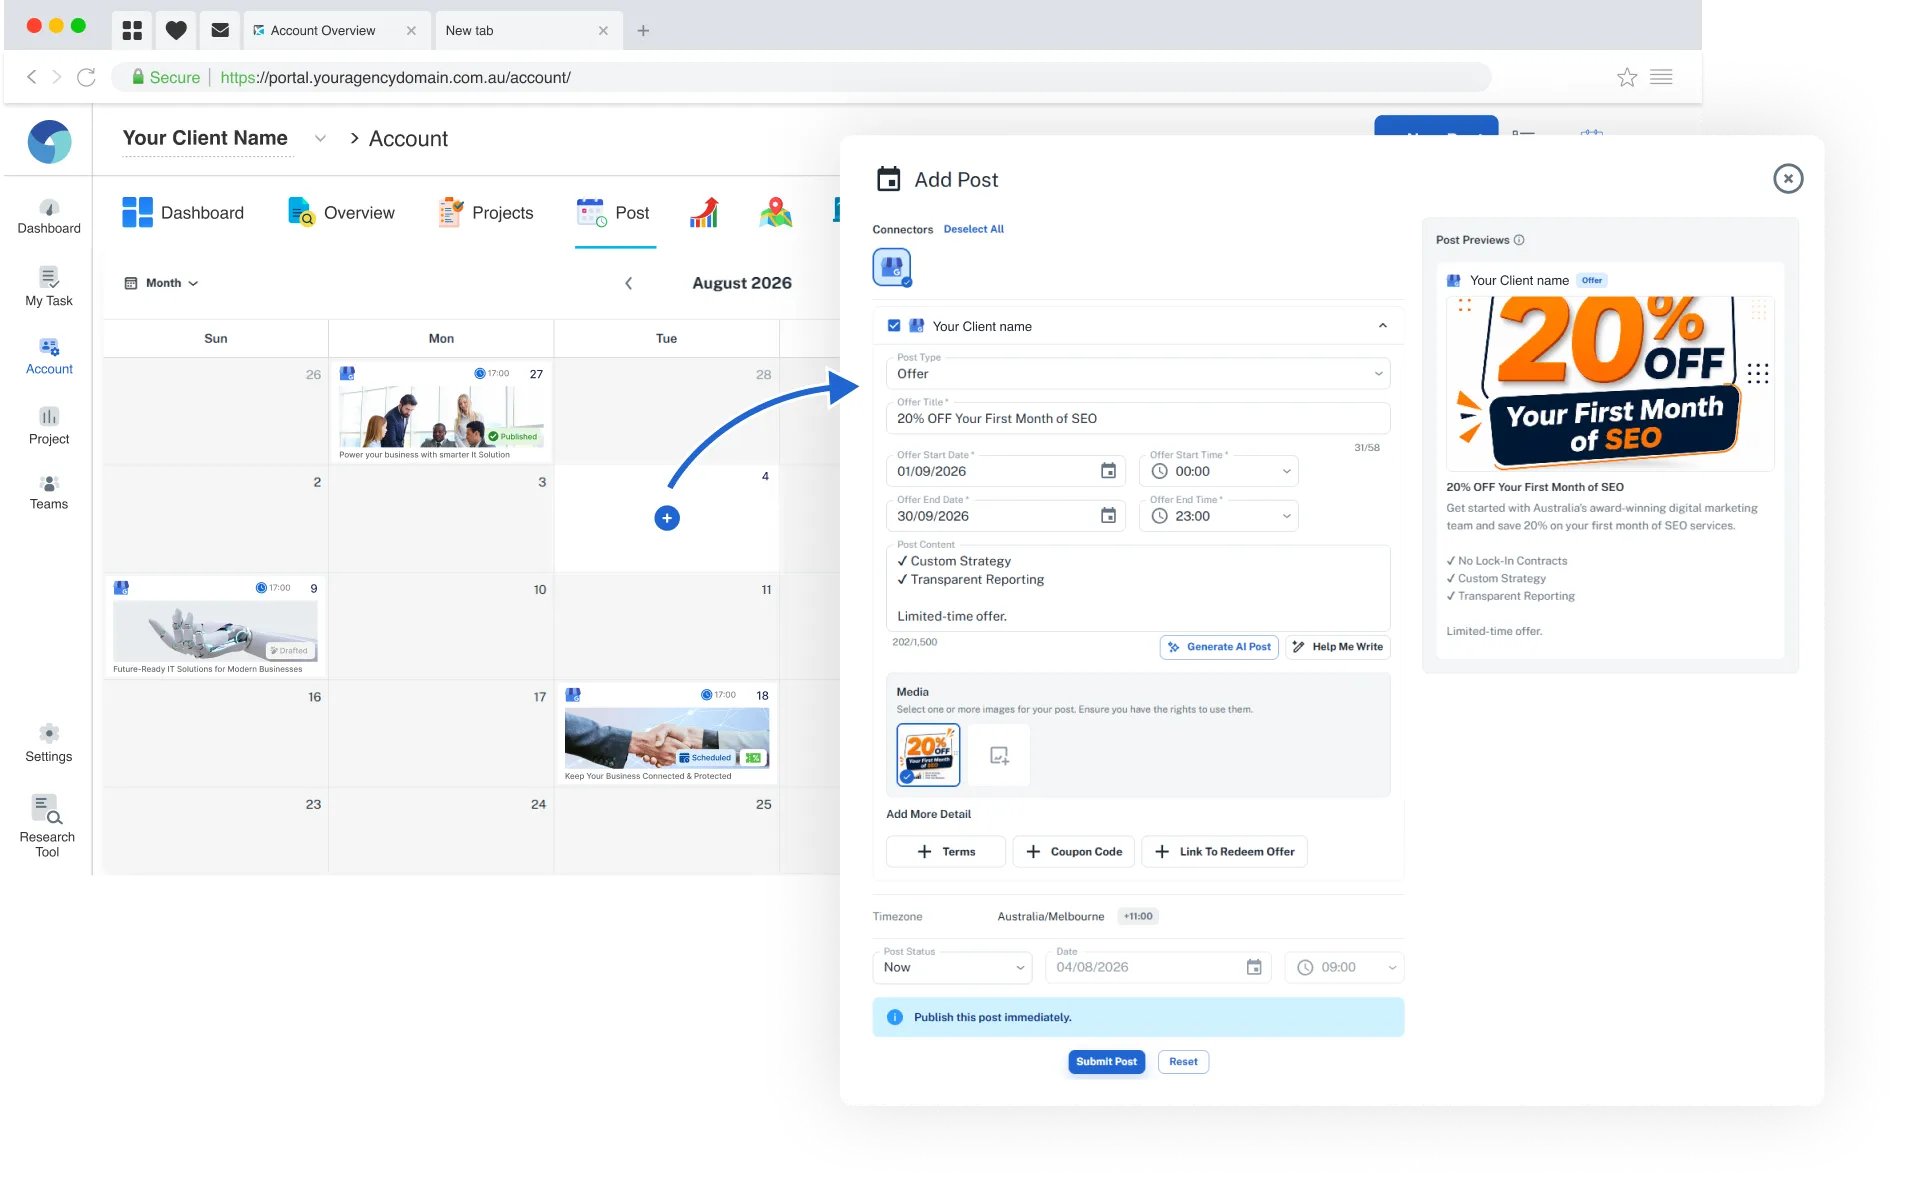
Google Business Profile posts are short updates displayed on a business listing in Google Search and Google Maps. They allow businesses to communicate with prospective customers while those users are actively searching for the business, its products or its services.
A post may include written content, an image or video, a link and a call-to-action button. Depending on the post, customers may be encouraged to visit a website, make a booking, place an order or learn more about an offer.
The three main GBP post types are:
- Updates: Suitable for announcements, business news, new services, helpful tips and general updates.
- Events: Time-sensitive posts with a title and specified start and end dates. These can be used for workshops, grand openings, webinars, seasonal events and other scheduled activities.
- Offers: Promotional posts that may include discount details, coupon codes, redemption links and terms and conditions.
Unlike general social media content, GBP posts are shown to people who may already be considering the business. Regular, relevant updates can help maintain an informative and engaging profile for these high-intent searchers.
Why Schedule Google Business Profile Posts?
Treating a Google Business Profile as an ongoing marketing channel rather than a one-time setup task helps businesses keep customers informed. Scheduling makes this activity more manageable by allowing content to be prepared in batches and published automatically.
- Maintain a Consistent Presence
Scheduling reduces the likelihood of a profile going for extended periods without new information. Businesses can prepare several weeks of content in one session and create a sustainable publishing schedule.
- Save Time Through Batch Creation
Instead of interrupting the working week to create individual posts, teams can set aside one focused block of time to prepare upcoming updates, events and offers. Once these posts are scheduled, DAXRM handles their publication.
- Simplify Multi-Location Management
Manually publishing the same update across numerous profiles can become a significant administrative task. DAXRM allows agencies and multi-location businesses to select several locations and schedule posts from one dashboard.
This helps each branch maintain a consistent presence while still allowing content to be tailored to individual locations where appropriate.
- Plan Seasonal Content in Advance
Offers, holiday trading updates, community events and seasonal services can be scheduled well before they become relevant. This reduces last-minute work and helps businesses publish time-sensitive information when customers need it.
DAXRM’s Google Business Profile Features
DAXRM provides more than post scheduling. From one platform, businesses and agencies can:
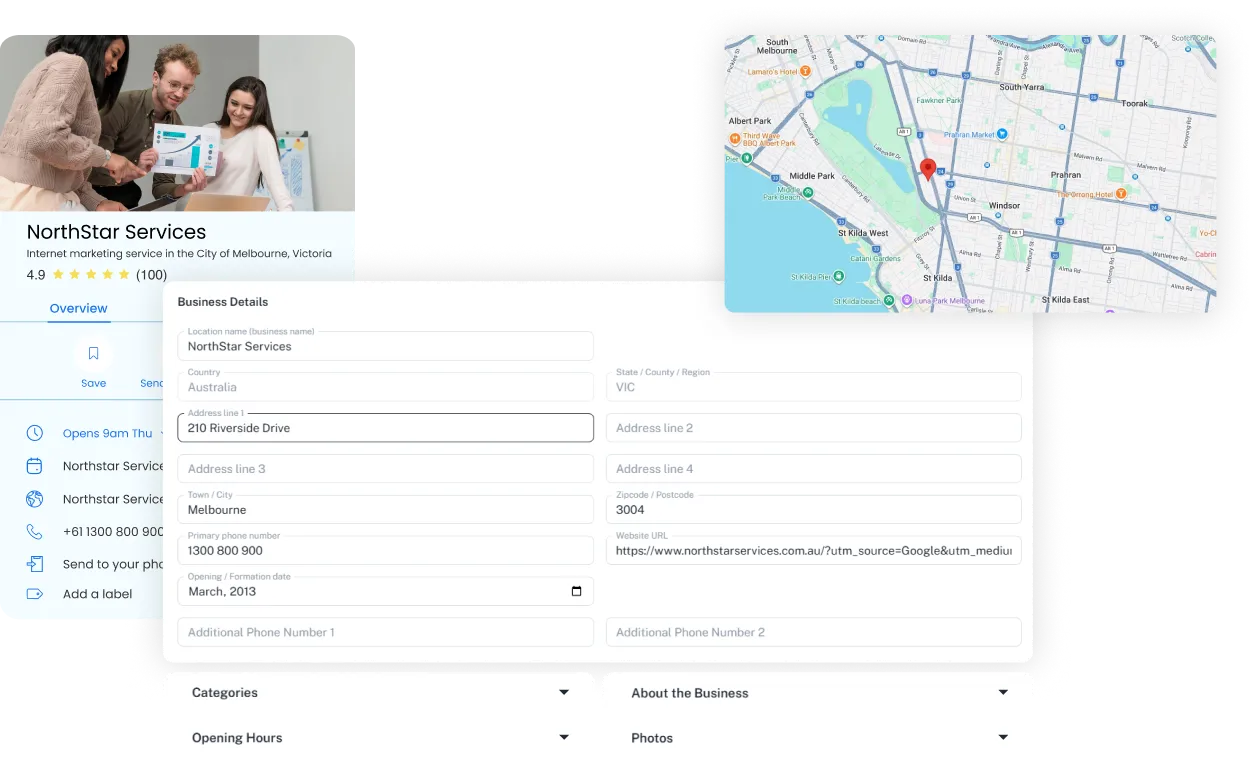
- Update business details, contact information, opening hours and profile attributes
- Manage action links for bookings, orders, appointments and quote requests
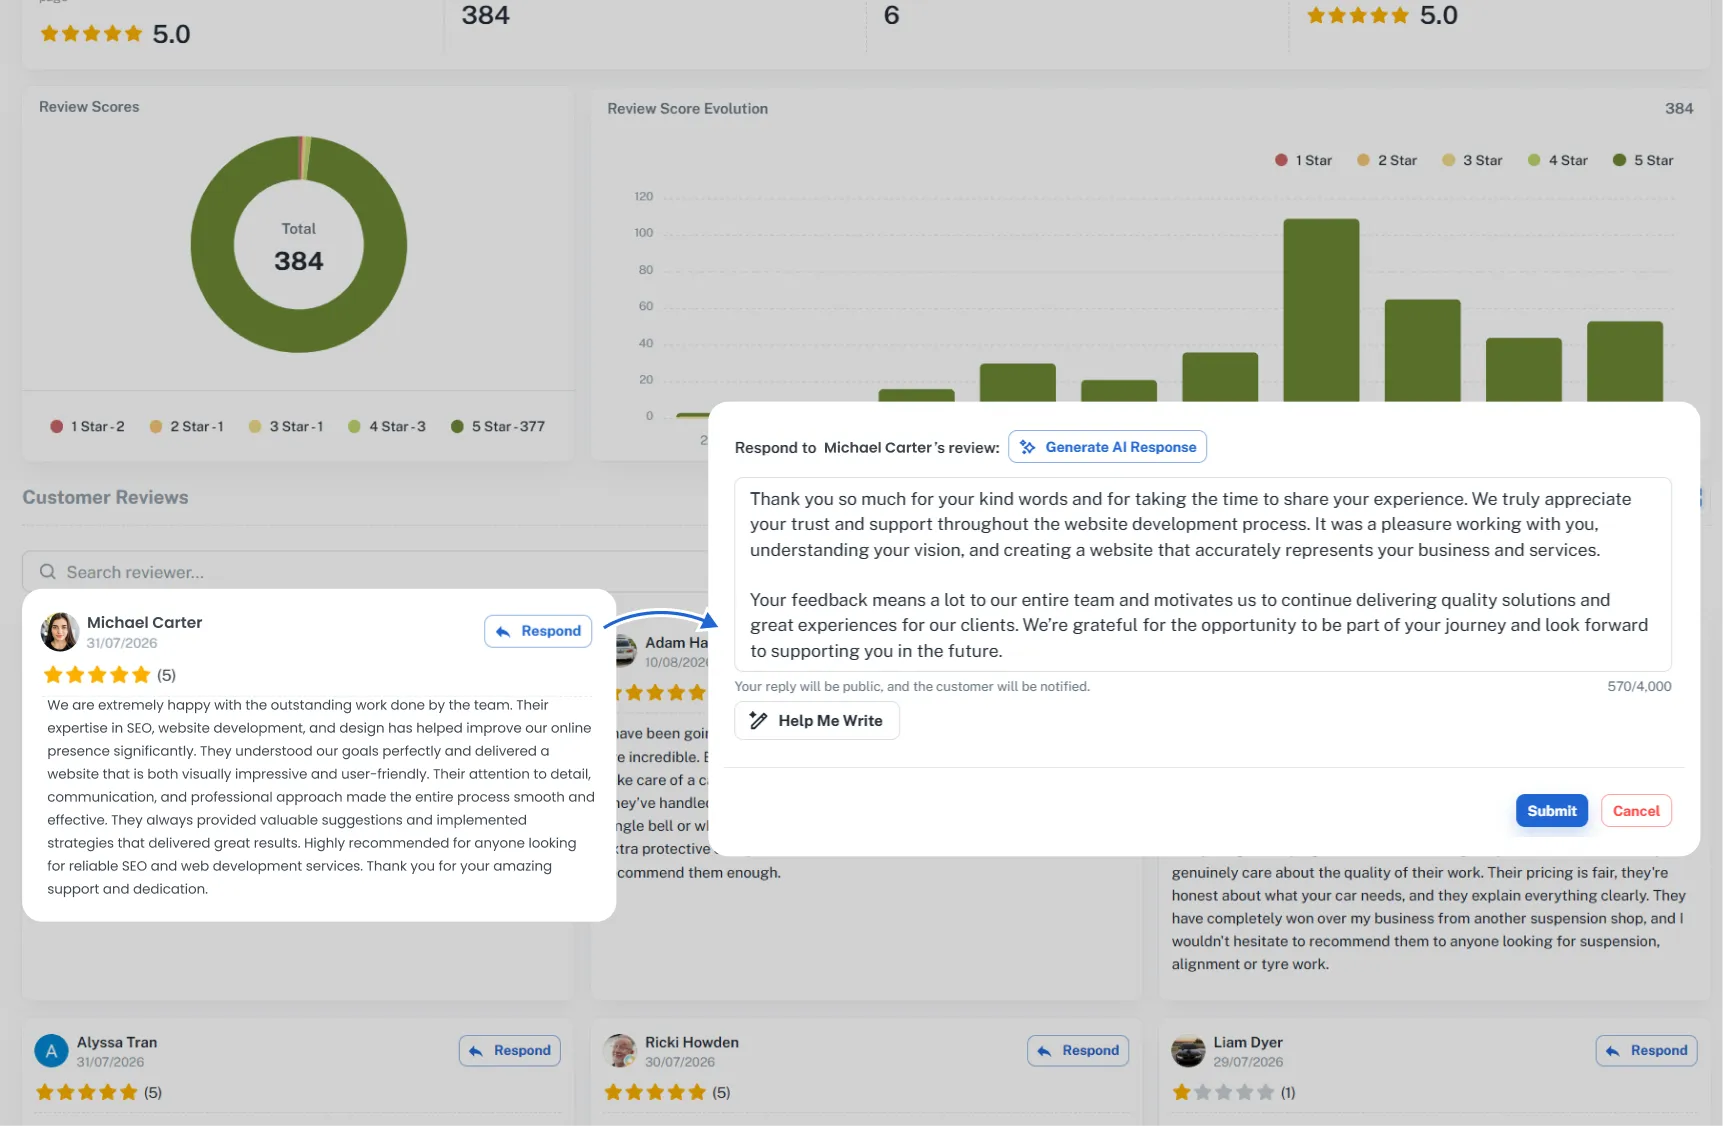
- Monitor Google reviews and prepare responses with AI assistance
- Review profile searches, views and customer actions
- Schedule updates, events and offers
- Publish content across one or multiple locations
- Create recurring daily, weekly, fortnightly or monthly posts
- Use AI assistance to prepare post content
- Connect GBP data with Looker Studio for custom reporting
These features allow profile maintenance, publishing and performance monitoring to form part of one coordinated workflow.
How to Schedule Google Business Profile Posts with DAXRM
Step 1: Sign In to DAXRM
Go to app.daxrm.com to create your account. You can register or sign in using a Google or Microsoft account.
After signing in, you will arrive at the DAXRM dashboard. This provides a central location for managing your campaigns and connected marketing integrations.
Agency tip: DAXRM supports white-label access, user roles and permissions. If clients or multiple team members will use the platform, configure their access early so each user can view or manage the appropriate information.
Step 2: Create Your First Campaign
DAXRM organises work through campaigns. A campaign will generally represent a client, business or individual location and acts as a container for the relevant integrations and reporting data.
From the dashboard, open the campaign creation section and enter the required business details. Once the campaign has been created, you can begin connecting its Google Business Profile.
Agencies managing different clients should create a separate campaign for each business. Depending on the account structure and reporting requirements, businesses with multiple branches may also benefit from organising locations into separate campaigns.
A clear campaign structure makes it easier to navigate between accounts, manage permissions and keep client data organised.
Step 3: Connect the Google Business Profile
Open the appropriate campaign and navigate to its integrations. Select the Google Business Profile integration and follow the prompts to authorise access through Google.
Sign in using a Google account that has the necessary owner or manager access to the profile you want to connect. Once authorisation is complete, select the relevant business location or locations.
If several locations are associated with the same Google account, DAXRM can bring them into a central management workflow. This avoids the need to sign into each profile separately whenever you want to publish an update or review its performance.
Your Google Business Profile must be verified and eligible to publish before posts can be sent through a third-party platform. If the profile has not been verified, complete the required Google verification process before continuing.
Step 4: Review and Optimise the Connected Profile
Before scheduling new content, review the current condition of the profile. DAXRM allows you to inspect existing posts, performance data, customer reviews and essential business information from the connected campaign.
Check that the following details are complete and accurate:
- Business name, address and phone number
- Website and appointment links
- Standard and special opening hours
- Business description
- Relevant business attributes
- Online ordering, booking or quote-request links
Correct outdated information before publishing new content. Accurate details help customers contact, visit or transact with the business and ensure new posts lead to the correct destination.
This is also a useful time to check recent reviews and identify any feedback awaiting a response. DAXRM’s AI assistance can help prepare a draft, which should then be reviewed and personalised before publication.
Finally, look at previously published posts and available performance data. This can help you avoid repeating recent topics and identify the content or calls to action that may be worth using again.
Step 5: Open the Post Scheduler
Within the campaign, open the Google Business Profile integration and navigate to the post scheduling section.
This is where you can create, schedule and manage upcoming GBP posts. Before beginning, make sure you have the necessary copy, image, destination link and campaign information ready.
Step 6: Choose the Post Type
Select the post format that best suits your message:
- Update: Use for announcements, news, tips, service information and general business activity.
- Event: Use for an activity with a defined timeframe. Enter the event title and relevant start and end dates.
- Offer: Use for discounts, sales and other promotions. Include any applicable coupon codes, redemption links or conditions.
Choosing the correct format ensures the post contains the fields customers need. For example, an event should clearly state when it will occur, while an offer should explain how customers can redeem it.
Step 7: Write the Post Content
Write a concise post that communicates the most important information early. Users may initially see only part of the text, so the opening should make the purpose and benefit clear.
Effective post content should:
- Lead with the main announcement, offer or customer benefit
- Use clear, natural language
- Include location-specific information where relevant
- Explain what the customer should do next
- Avoid unnecessary detail or keyword stuffing
For example, instead of writing a generic announcement such as “Explore our latest services,” identify the service, location and benefit:
Need a faster way to prepare your business for the end of the financial year? Book an accounting consultation at our Richmond office this month.
Location references should be included naturally. For multi-location campaigns, consider whether one general post is suitable for every profile or whether localised versions would provide a better customer experience.
Using DAXRM’s AI Post Writer
If you do not want to write from scratch, use DAXRM’s AI post writer to prepare a draft. Enter a topic or short description of the intended post and allow the tool to generate initial copy.
Always review AI-generated content before scheduling it. Check that it:
- Accurately represents the business
- Reflects the appropriate brand voice
- Includes correct dates, locations and offer details
- Avoids unsupported or exaggerated claims
- Provides a clear next step
AI assistance can be particularly useful when preparing several posts at once, but human review remains important.
Step 8: Add an Image or Visual
Upload a relevant, high-quality image to accompany the post. The visual should accurately represent the business, service, product, event or offer being promoted.
Use a clear JPG or PNG image that displays well on both desktop and mobile screens. Avoid blurry photographs, awkward cropping and graphics containing excessive text. Before confirming the post, check that important visual elements remain visible in the preview.
For a multi-location campaign, decide whether a shared branded image is appropriate or whether location-specific photographs would make the post more relevant.
Step 9: Add a Call-to-Action
Where supported, choose a call-to-action button that matches the post’s objective. Available options may include:
- Book
- Order Online
- Buy
- Learn More
- Sign Up
- Call Now
The CTA should lead directly to the most relevant destination. An appointment post should link to the booking page rather than the general homepage, while an offer should direct customers to the page explaining how it can be redeemed.
Check the URL before scheduling the post, particularly when publishing across multiple locations. Each profile may require a different location, booking or landing-page link.
Step 10: Select the Publishing Locations
Choose where the post will be published. Depending on the campaign, you may select:
- One business location
- A specific group of locations
- Every applicable location in the network
This is one of the most valuable functions for agencies and multi-location businesses. Rather than recreating and publishing the same post through each individual profile, the content can be distributed from one workflow.
However, efficiency should not come at the expense of relevance. Check whether the post’s offer, opening hours, event details, links and location references apply to every selected profile. If they differ, create suitable variations.
Step 11: Set the Publication Schedule
Select the date and time you want the post to be published. This allows you to coordinate posts with promotions, events, holidays and other marketing activity.
DAXRM also supports recurring schedules, including:
- Daily
- Weekly
- Fortnightly
- Monthly
Recurring scheduling can be useful for genuinely repeatable information, such as regular appointment availability or an ongoing content series. Avoid repeatedly publishing outdated offers or identical posts that no longer provide value. Review recurring content periodically to confirm that it remains accurate and useful.
Step 12: Review and Confirm
Before scheduling the post, check:
- Post type
- Copy and spelling
- Dates and offer conditions
- Image selection and cropping
- Call-to-action button
- Destination URL
- Selected locations
- Publication date and time
- Recurrence settings
Once everything is correct, confirm the schedule. DAXRM will publish the post at the specified time.
Track GBP Results and Automate Reporting
Publishing is only part of effective Google Business Profile management. Reviewing performance helps you understand how customers are finding and engaging with each profile.
DAXRM reporting can consolidate data relating to profile searches and views, website clicks, calls, direction requests, reviews, published posts and individual location performance. Results can be compared across different reporting periods to identify broader trends.
For multi-location businesses, location-level reporting can help reveal whether particular branches are generating more calls, website visits or direction requests. Agencies can use this information to demonstrate results and identify where a profile or content strategy may need further attention.
DAXRM also integrates with Looker Studio, allowing GBP information to be incorporated into custom, client-ready reports alongside other marketing channels. Reports can be configured around the metrics most relevant to each client and scheduled for regular delivery.
Best Practices for Scheduling GBP Posts
- Establish a Sustainable Posting Cadence
Choose a frequency your team can maintain. For many businesses, preparing several posts in one monthly session is more practical than creating content immediately before each publication date.
A consistent, realistic schedule is generally more useful than an ambitious calendar that is abandoned after several weeks.
- Lead With the Main Message
Place the most useful or compelling information at the beginning of the post. Tell readers immediately about the offer, event, service, update or benefit rather than opening with a generic introduction.
- Keep Content Locally Relevant
A Google Business Profile represents a particular business location, so its posts should be useful to customers in that area.
Reference local services, trading conditions, events or community information where appropriate. Multi-location businesses should avoid automatically publishing content that does not apply to every selected branch.
- Use Clear, Mobile-Friendly Visuals
Choose images that remain easy to understand on a smaller screen. Preview the crop, keep important subjects away from the image edges and avoid placing large amounts of text inside the visual.
- Plan Around Important Dates
Build a content calendar around:
- Public holidays
- Changes to trading hours
- Seasonal demand
- Product launches
- Local events
- Workshops or appointments
- Limited-time promotions
Scheduling this content in advance reduces the chance of missing important marketing opportunities.
- Give Every Post a Clear Purpose
Decide what you want the reader to do before writing the post. The intended action might be to visit a page, book an appointment, place an order, attend an event or redeem an offer.
Align the copy, image and CTA with that single objective.
- Review Performance Regularly
Use DAXRM’s analytics to monitor broader trends and compare results over time. Consider which subjects, formats and CTAs are associated with website visits, calls or other valuable customer actions.
Use these findings to refine upcoming content rather than repeatedly publishing the same types of posts without assessing their performance.
- Keep Profile Information Current
Posts cannot compensate for incorrect business details. Review contact information, links and opening hours regularly, and update special hours before public holidays or other changes.
Reviews should also be monitored and answered consistently. DAXRM’s AI-assisted response feature can speed up the drafting process, but each reply should still be checked and personalised
Keep Your Google Business Profile Working for You
Consistent GBP posting is much easier when content can be created in batches, scheduled ahead and distributed efficiently across multiple locations.
DAXRM brings post scheduling, profile management, reviews, insights and reporting into one dashboard. Agencies and local businesses can use it to maintain accurate, active profiles while reducing the manual work involved in managing separate accounts.
Ready to simplify your Google Business Profile management? Get started with DAXRM for free.



![Top 10 Best Project Management Software for Digital Agencies [2025]](https://www.daxrm.com/wp-content/uploads/2025/01/Top-10-Best-Project-Management-Software-for-Digital-Agencies-2025.webp)


